Set-up of basic motorhome kit

Important Notes Before You Start

Motorhome owners often contact us asking how to operate their air suspension, what pressure it should run at, or how to set it up after losing the original instructions. In many cases, the system on the vehicle is not actually an AirRide kit at all. Over the years, there have been many companies using names similar to ours (unfortunately), and many of those businesses have since disappeared. Their websites stop working, their phone numbers no longer connect, and their email addresses go dead, so people end up calling us for help.

We are the genuine AirRide/Airide company at airride.co.uk. We have specialised in air suspension for over 25 years and are still here, whereas many competitors have come and gone. We are 100% air suspension – we don’t do anything else.

These notes are intended to provide general guidance for owners of basic motorhome air suspension systems, specifically the common rear load support kits. They are based on broad experience with the types of systems commonly fitted to motorhomes, vans and campervans, but they are not specific instructions for your exact vehicle. We have not seen your particular motorhome, conversion, loading, ride height, or installation.

If in any doubt, the vehicle should be inspected by a competent motorhome specialist or suspension specialist before use. This is certainly true if the system is not working.

Safety First

Never work under a vehicle without proper support.

Do not under any circumstances trust any air suspension system to remain inflated while you are under the vehicle. Air suspension can drop without warning. Unsafe working practices can result in very serious injury or death.

Air suspension also introduces additional hazards beyond ordinary suspension work. These systems must be treated with care and proper procedures must be followed. This is particularly important when jacking a vehicle up, changing wheels, carrying out servicing, or inspecting suspension parts.

First Inspection Before Inflating the System

If you have just bought the motorhome, if it has been standing for a while, or if you do not know the history of the suspension, the first step should be a visual inspection before adding air.

Look carefully at the air bags, also known as air springs or bellows. If the rubber is visibly perished, cracked, chafed, split, distorted, or otherwise deteriorated, the bags should be replaced before the system is used. Small cracks in the rubber are a common warning sign, but also small cracks are very common in older systems that are working fine.

As a matter of good practice, air bags should normally be replaced in pairs. The best place to obtain replacement parts is the original installer or manufacturer, if they still exist. In our experience, a very large number of air suspension companies from past years no longer trade. If you cannot identify the original manufacturer, or the manufacturer no longer exists, please do get in touch. We may be able to help identify what you have or suggest possible next steps.

A Note About Left and Right "Taps"

Some systems are fitted with separate left and right air lines and have taps or valves to isolate or control each side. AirRide does not use, and has never used, those taps on our systems. The reasons are that we consider them unreliable, confusing, prone to leaks or seizing, and they allow left/right connection whilst driving which is dangerous.

If your motorhome has taps fitted for left and right, that does not mean the system is unsafe, but it is a sign that the kit may not be one of ours, and could be improved. Different manufacturers have used different approaches over the years. If you are unsure what you have fitted, send us clear photographs and we will try to point you in the right direction.

pressure gauge

What Is a Load Support Kit?

A very common system in its most basic form fitted to motorhomes is usually a rear load support kit. This is also sometimes termed auxiliary suspension, 2 stage suspension, semi-air or semi-air suspension or secondary springs or secondary suspension. These terms all mean the same thing.

These systems are normally fitted to:

  • improve ride quality
  • reduce rear-end sagging
  • reduce grounding at the back of the vehicle
  • improve support when the vehicle is heavily loaded
  • improve stability and control

They are usually fitted alongside the original suspension, not as a total replacement for it. Different types of suspension are available that replace the rear leaf or coil springs and is known as full air suspension – this page is about load support systems.

What Pressure Should I Run?

This is the question we get asked most often.

There is no single correct pressure for every vehicle. The right pressure depends on:

  • the base vehicle
  • the type of rear suspension
  • the motorhome conversion
  • how heavily it is loaded
  • the front to rear weight distribution
  • personal preference

In general, a basic motorhome air suspension system will usually operate somewhere between 20 and 100 PSI. So long as you stay within the safe operating range for the system, there is usually no single right or wrong figure. Most low spec bags are rated to 100  or 105psi which is why we limit this guide to inflation to 100psi.

Two people can drive the same motorhome and prefer slightly different pressures. One may prefer a softer ride, while another may want more support and firmness. As a very general guide, many leaf-spring motorhomes end up somewhere in the region of 50 to 80 PSI, but there are exceptions. Coil-spring and torsion-bar chassis, including AL-KO applications, can be quite different.

Minimum Pressure Matters

A basic air suspension system should not normally be run with no air in the bags. This will quickly damage the bags.  As a general rule, a minimum of 20 PSI should be maintained in the air bags at all times, including during storage. Running with insufficient pressure can allow the bag to fold incorrectly, rub, pinch, or otherwise cause damage.

This is important even when the motorhome is parked up over winter. A properly functioning system should hold air for a very long time, much like a tyre, but it should still be checked periodically. Don’t deflate the system over winter – increase the pressure, especially if you have a small leak – slow puncture style deflation over an extended period of time.

black faced pressure gauge showing safe zone

How Do I Know If the System Is Working?

The easiest way to get started is with a tyre inflator that has a pressure gauge. Most inflators also have a small bleed button or trigger position that allows you to release pressure gently.

To test the system:

  1. Inflate the system to 20 PSI.
  2. Look at the vehicle height and, if possible, take a measurement from a repeatable point. (We measure at 12 o’clock of the wheelarch to the ground)
  3. Increase pressure in 10 PSI steps up to 100 PSI if needed.
  4. Observe how much lift or support occurs at each stage. If the vehicle stops lifting then you have reached the limit of the suspension.

What you will usually find is:

  • at very low pressures, there may be little visible lift. The point at which it starts to lift we term the pickup point. Usually around 25-45 psi. At this pressure the air suspension is doing almost nothing at all, and you should not set it below the pickup point usually.
  • through the middle of the range, the vehicle may start to lift more noticeably
  • at the top end, additional lift may reduce again and the system may feel firmer without much extra height gain. This is normal.

If the handbrake is applied during inflation or deflation, you may hear creaking or find the handbrake slightly tighter to release. This is usually just the suspension position changing and is not normally a cause for concern. If you cannot let your handbrake off easily – reduce the air pressure and it will be easy again.

How Do I Find the Best Pressure?

The best way is by road testing methodically.

A good starting method is:

  1. Inflate the system to 100 PSI. (you should be there from the test above)
  2. Drive the vehicle on a mixture of roads, ideally including smoother main roads and rougher back roads, potholes, resurface roads, junctions or roundabouts.
  3. Stop safely.
  4. Reduce the pressure by 10 PSI.
  5. Drive again.
  6. Repeat until you reach 20 PSI, provided you are not grounding the vehicle or otherwise creating problems.

Make notes as you go. That matters more than many people realise.

At each pressure, ask yourself:

  • What is the handling like?
  • What is the ride quality like?
  • Does the vehicle feel more stable?
  • Does it feel too hard?
  • Does it bounce?
  • Does it crash or bang over bumps?
  • Does it still have enough rear support?
  • Is it grounding at the rear?

The correct pressure is usually the one that gives the best compromise between:

  • comfort
  • support
  • stability
  • clearance
  • handling

When the cutlery in the draws goes quiet is a good indication you are in the right area!!!

There is unlikely to be one magic figure for every situation. For example, the ideal pressure on a fast main road may be different from the ideal pressure on rough rural roads. Some owners settle on one all-round pressure, while others adjust it depending on the trip and loading.

Leave a Note in the Vehicle

Once you have found pressures that work well, write them down and keep a note in the motorhome.

This is helpful because:

  • it is easy to forget after a year or two
  • a partner or family member may need the information
  • a future owner may not know what to run
  • many second-hand vehicles are sold with no instructions at all

We provide stickers for recording preferred running pressures. If you would like one, email us your name and address.

Is It Really an AirRide or Airide Kit?

Quite often, people ring us saying they have "AirRide suspension" when what they really mean is simply that they have some kind of air suspension.

There have been many companies using similar trading names over the years. Some copied branding styles, some used names that sounded alike, and most are no longer around. That is one reason owners of older vehicles so often end up contacting us when instructions are missing.

We are the genuine AirRide at airride.co.uk, and we have been specialising in air suspension for over 25 years. We operate both the AirRide and Airide brands.

If your kit is not one of ours, we will still try to help with general guidance where we can, but obviously we cannot give model-specific instructions for systems we did not design, supply, or install.

Be Careful When Jacking the Vehicle Up

This point is extremely important.

With many air suspension systems, especially those using reversible-sleeve type air springs, the bags should be deflated before the axle hangs fully down with the wheels off the ground.

If the suspension is allowed to droop with the bags inflated, the bags may be damaged. This can also create a dangerous situation for the person working on the vehicle.

Additional care is required when:

  • jacking the vehicle up
  • changing wheels
  • carrying out servicing
  • recovering a vehicle
  • lifting the vehicle on a workshop ramp

If a mechanic is unfamiliar with air suspension, tell them the vehicle is fitted with it before work begins.

If the Vehicle Has Been Standing

If a motorhome has been standing for months or years, do not assume the system is ready for use just because it still inflates.

Before using it, check for:

  • cracked or perished bags
  • corroded brackets
  • loose fittings
  • damaged airlines
  • signs of rubbing or chafing
  • leaks (most commonly around air fittings and bag rubbers)
  • poor previous repairs

A second-hand motorhome may have had suspension parts fitted many years (or decades) ago, and the current owner may know nothing about the installation.

General Guidance Only

These notes are intentionally general because there are many different systems on the market and many different ways motorhomes are built and loaded. They are meant to help owners get started safely and sensibly, particularly when original instructions are missing, but they are not a substitute for proper inspection.

If the vehicle leans, rides badly, grounds heavily, will not hold pressure, has perished bags, or shows any other sign of fault, the system should be inspected properly before further use.

Need Help?

If you want us to try to identify your suspension, email us clear photographs of:

  • the air bags
  • the brackets
  • the valves or inflation points
  • any gauges or controls
  • the rear suspension from a little distance back

Also tell us:

  • the make and model of the motorhome
  • the base vehicle
  • the year
  • whether it has leaf springs, coils, or an AL-KO chassis if known
  • what problem you are trying to solve

We may not always be able to identify every system, especially older kits from defunct manufacturers, but we will do our best to help.


pressure gauge

OLD VERSION

Please note:

Motorhome owners with basic air suspension often call us to ask how to properly operate their air suspension. These notes are about getting started with most of the commonly-available systems. Since they are based upon never having seen your particular motorhome or conversion, they are intended for guidance only. If in any doubt take the vehicle to a motorhome specialist for inspection.

Safety First!

Don not under any circumstances work under a vehicle without adequate levels of support. Never trust any air suspension system to stay inflated whilst you are under it. Unsafe working practices with any suspension can result in very serious injury or death. Air suspension has additional concerns and procedures which must be adhered to - they have additional dangers of injury or death.

The first thing to do before putting air in the system is to carry out a visual inspection of the air bag - particularly if you have just bought a vehicle or it has been standing for a while. If the bag is perished (has small cracks to the rubber) it will need to be replaced. Safe working practice is to replace bags in pairs. The first place to start is the original manufacturer or installer if they still exist. During our time in the air suspension business almost none of the original manufacturers still exist. If you need replacement parts and the manufacturer does not exist please do get in contact.

What is a load support kit?

A load support kit is the kind of air suspension you will likely have fitted to your motorhome. They are fitted to improve ride quality, reduce grounding, and lift sagging vehicles.

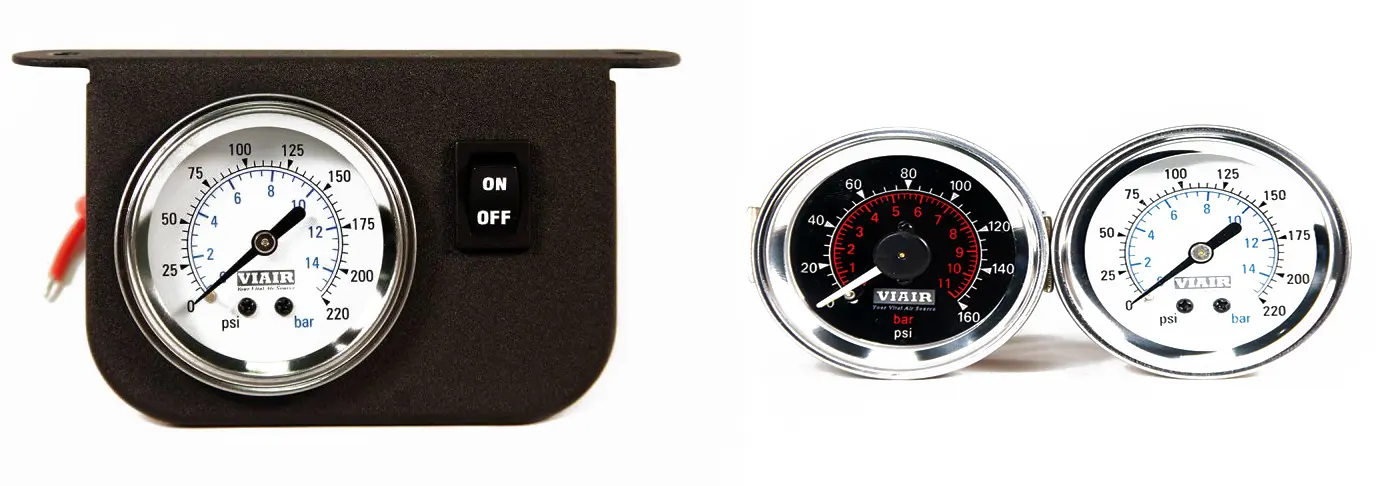
What is the right air pressure for my suspension?

Each person would probably consider the quality of their air suspension perfect for them at a different pressure. Thus, there is no right or wrong pressure, so long as it is between 20 and 100 PSI. Each vehicle is built and loaded differently, so it makes sense that the correct pressure on each vehicle is different. Most airbags (also called air springs and sometimes bellows) on the market are rated up to around 100 psi. For leaf spring motorhomes it should not be necessary to go to this pressure although it varies from vehicle to vehicle.

pressure gauge

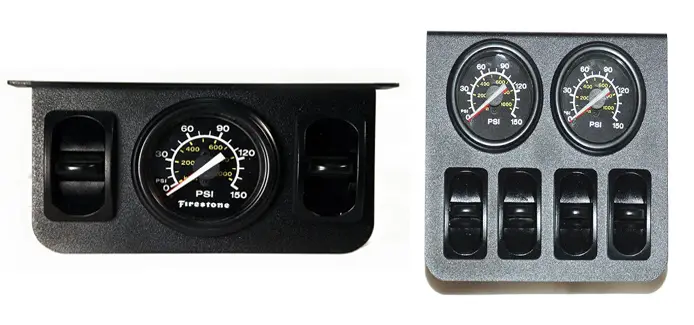
How do I know my air works?

To test the system you will ideally need to have or borrow a tyre inflator with a gauge. Most have a side button which will gently lower the pressure, although most people don’t even notice it!

Inflate the vehicle to 20 PSI and notice the height of the vehicle – you can measure at 10 PSI intervals right up to 100 PSI. This will give you an indication of the range the bags work at – initial increases will provide little or no increase in the height of the vehicle. You should then notice that lift occurs in the mid-range, and as you get to the top there is again not much additional lift.

If the hand brake is on, some creaking may occur as it is lifted and dropped – you may also find the handbrake tighter to release. Don’t worry, this is normal!

pressure gauge

How do I set the right pressure?

To begin with, leave the vehicle at 100 PSI and go for a drive; ideally on a combination of both bumpy back roads and smoother main roads.

After you have a feel for the vehicle, stop safely and drop the pressure by 10 PSI. Repeat this until you get to 20 PSI (provided you can drop that low without grounding).

We strongly advise taking notes of each pressure and how it feels on both roads and corners. Ask yourself:

  • What is the handling like?
  • What is the ride quality like?
  • What are the load support and stability like?
  • Does the motorhome bounce or crash?

After this you will have a good indication of what pressure is needed to drive. The perfect pressure may be different on main roads and back roads and you will probably have to make some sort of compromise. Leave a note in the vehicle of what pressures you decide work best as it can be hard to remember years later, or for a new owner to know (we provide free stickers if you email your name and address.)

As a general rule, most leaf-spring motorhomes would need between 50 and 80 PSI. Coil-spring or torsion-bar (AL-KO) vehicles can be very different. If you’re not sure which kind of spring you have, e-mail us and we’ll ask for some pictures to try and work it out for you.

pressure gauge

Be careful!

Please be warned that running the vehicle with no pressure will damage the bags. A minimum of 20 PSI should be retained in the bags at all times - including when stored over the winter. A correctly functioning air suspension system will hold air for years just like a tyre. It should be checked regularly just like a tyre.

Also be aware that all bags (particularly reversible-sleeve bags) should be deflated when the vehicle is jacked clear of the ground or again they could be damaged. Furthermore, this is potentially very dangerous for the user/mechanic. Additional procedures are required when working on air suspension, including when changing wheels.

Set-Up of Basic Motorhome Air Suspension Kit

Important Notes for Motorhome Owners

Many motorhome owners with basic air suspension systems contact us for guidance on how to properly operate their air suspension. This information is intended to provide general guidance for most commonly available systems. Since we haven't inspected your particular motorhome or conversion, these tips are for reference only. If you're ever in doubt, we strongly recommend having your vehicle inspected by a motorhome specialist.


SAFETY FIRST!

Never work under a vehicle without proper support!
Always ensure the vehicle is securely lifted and supported with appropriate jacks and jack stands before working underneath. Under no circumstances should you trust an air suspension system to stay inflated while you're working underneath the vehicle. Unsafe practices with any suspension system can result in severe injury or even death. Air suspension systems come with additional safety risks and require extra caution during installation and maintenance. Always follow safe working practices.

Before inflating the system, perform a visual inspection of the airbag, especially if you've recently purchased the vehicle or if it has been stationary for a while. If you notice any signs of wear, such as small cracks in the rubber, the airbag will need to be replaced. As a best practice, replace air springs in pairs for consistent performance. If you're unable to find parts from the original manufacturer or installer, don't hesitate to get in touch with us for assistance.


What is a Load Support Kit?

A load support kit is typically the type of air suspension installed on most motorhomes. Its primary purpose is to improve ride quality, prevent bottoming out (grounding), and reduce sagging, particularly when carrying heavy loads. These kits help ensure that your motorhome remains level, providing a smoother and safer driving experience.


What is the Correct Air Pressure for My Suspension?

The ideal air pressure for your motorhome’s air suspension can vary depending on your specific vehicle and how it's loaded. There is no one-size-fits-all answer. However, air pressure should generally be kept between 20 and 100 PSI. Most air springs (also known as airbags or bellows) are rated to handle pressures up to around 100 PSI, though most motorhomes won’t need to reach this pressure. For leaf-spring motorhomes, pressures lower than this are typically sufficient, but the optimal pressure for your vehicle will depend on your specific setup.


How to Test Your Air Suspension System

To ensure the air suspension system is functioning correctly, you’ll need a tyre inflator with a gauge (if you don’t have one, they can be borrowed or purchased). Most inflators feature a side button that allows you to gradually adjust the pressure, which is useful for testing.

  1. Start at 20 PSI: Inflate the air suspension system to 20 PSI and observe how the vehicle height changes. You can increase the pressure in 10 PSI increments, up to 100 PSI, and measure the change in height at each stage.
  2. Observe Lift Characteristics: At lower pressures, there will likely be little to no change in the height of the vehicle. However, once you reach the mid-range pressures (around 40-60 PSI), you should notice a more significant increase in lift. As you approach higher pressures, additional lift will become less noticeable.
  3. Handbrake Creaking: When inflating or deflating, you might hear some creaking or find the handbrake becomes slightly more difficult to release. This is completely normal and should not be a cause for concern.

How to Set the Right Pressure for Your Vehicle

To find the optimal air pressure, start by inflating your suspension to 100 PSI and take the vehicle for a test drive. Aim to drive on a variety of road surfaces, including bumpy back roads and smoother main roads.

  • Take Notes: During your test drive, pay attention to how the vehicle handles, the ride quality, and the load support at different pressures.
  • Adjust Pressure in Increments: After driving, reduce the air pressure by 10 PSI increments and repeat the test drive. Continue until you reach a pressure where the vehicle is handling well without bottoming out (typically no lower than 20 PSI).
  • Evaluate Ride Quality: Ask yourself these questions as you test different pressures:
    • How does the vehicle handle on curves and uneven terrain?
    • Is the ride smooth, or does it feel bouncy or harsh?
    • Does the air suspension provide adequate load support and stability?
    • Does the vehicle bottom out or crash over bumps?

Record the pressure at which the vehicle feels most stable and comfortable, and keep this note in the vehicle for future reference. You may find that the ideal pressure varies depending on the type of roads you're driving on. It’s also helpful for future owners, and we can provide free stickers with the pressure settings if needed.

As a general guide, most leaf-spring motorhomes typically require 50 to 80 PSI for optimal performance. Vehicles with coil-spring or torsion-bar (e.g., AL-KO) suspension may require different pressures. If you're unsure about your suspension type, feel free to contact us with pictures of your setup, and we'll help determine the correct pressure range.


Important Safety Considerations

  • Never operate the air suspension system without a minimum of 20 PSI in the bags. Running the system at too low a pressure can damage the airbags. This is particularly important when the motorhome is in storage, especially during the winter months.
  • Deflate the airbags when jacking up the vehicle. If the vehicle is raised off the ground for any reason (such as changing a tyre), make sure the airbags are fully deflated to prevent damage. This is a crucial safety measure for both you and the mechanic working on the vehicle.
  • Regular Checks: A well-maintained air suspension system should hold air for extended periods, much like the tyres on your vehicle. However, it’s still essential to check the air pressure regularly to ensure everything is functioning properly.

By following these steps and tips, you’ll be able to maintain your motorhome’s air suspension system and enjoy a smoother, more controlled ride. Always prioritize safety, and if you ever have questions or concerns, don’t hesitate to reach out to us for expert advice.